Configuring Windows Mobile Device Center 6.1 to work with Windows 10

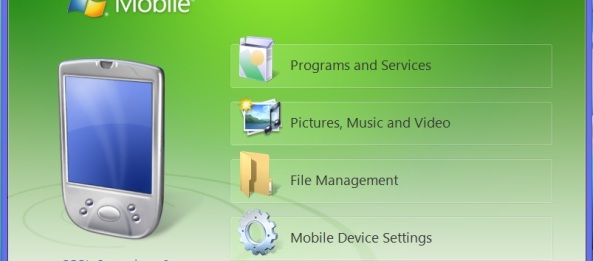
The blog post describes the steps on how to set-up Windows Mobile Device Center to work in Windows 10.

Download WMDC Installer here

  1. Unplug device from PC
  2. Open windows file browser
  3. Browse C:\Windows\WindowsMobilewmdc
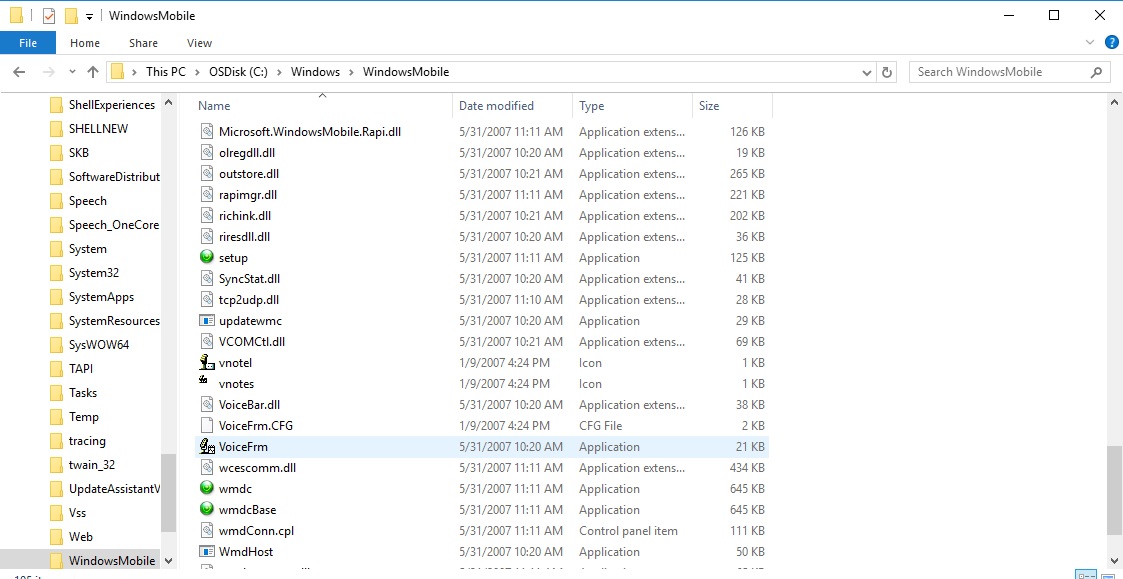
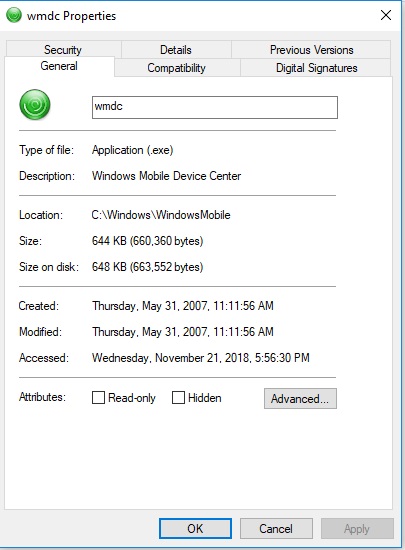
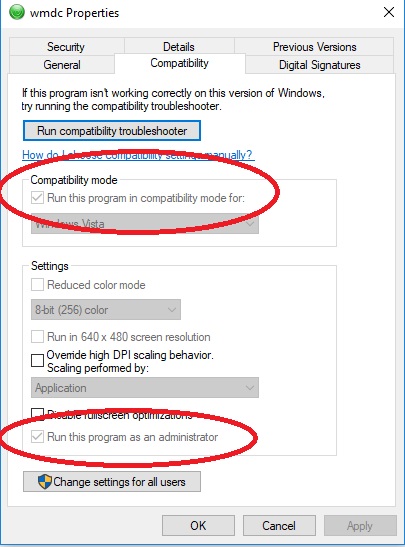
  4. Right click on WMDC and choose Propertieswmdc_properties
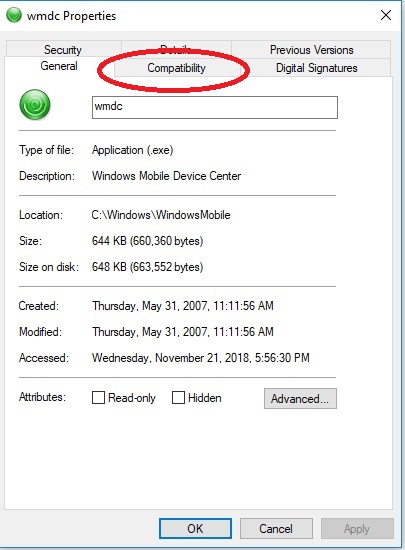
  5. Click on Compatibility

wmdc_properties

    6. Click on Change settings for all users

wmdc_properties_comp

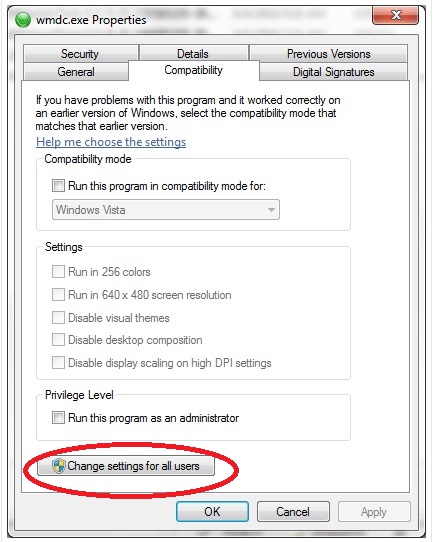
    7. Select the Check Box Run this program in compatibility mode for Windows Vista           and the box for Privilege Level Run this program as administrator, click Apply,              then OK 

wmdc_properties_comp_asadmin

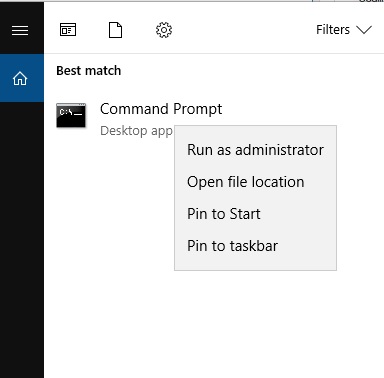
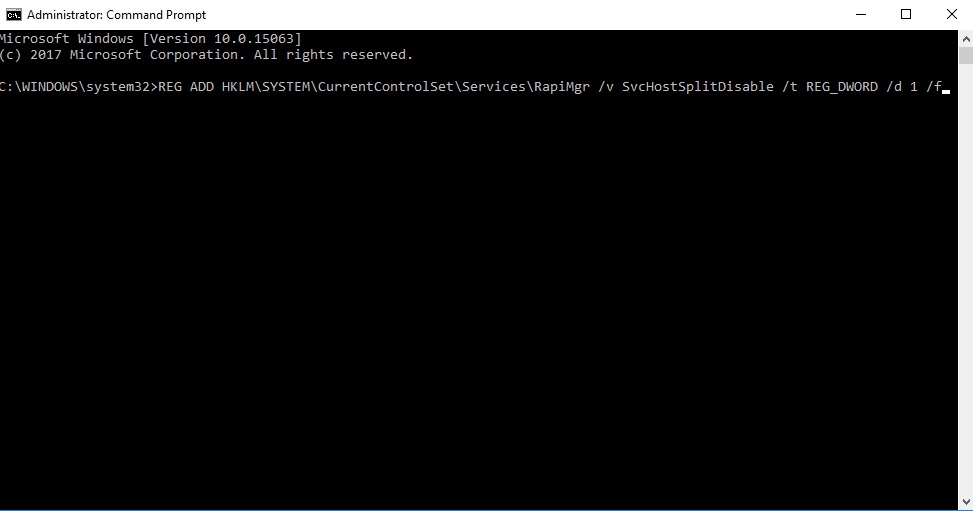
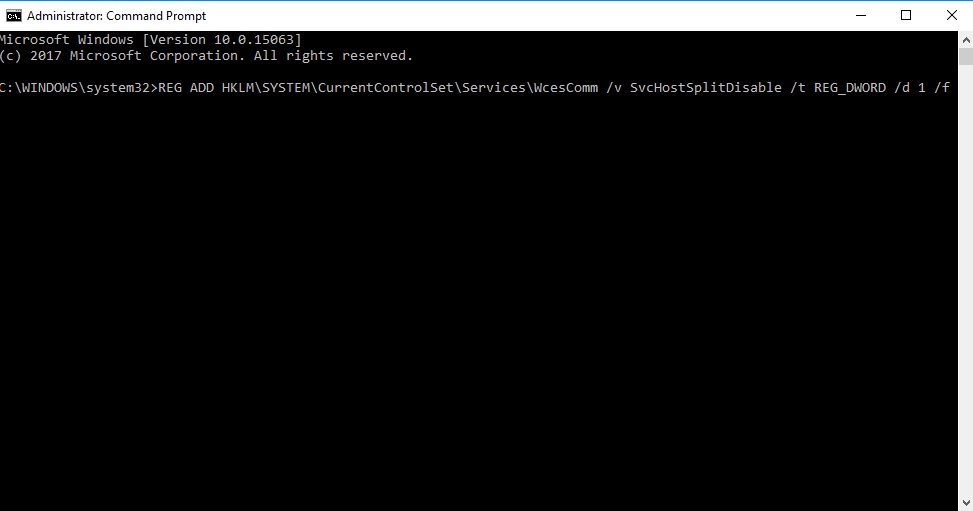
    8.  Run the command prompt as an administrator and run the following commands one at a time

cmd_admin

“REG ADD HKLM\SYSTEM\CurrentControlSet\Services\RapiMgr /v SvcHostSplitDisable /t REG_DWORD /d 1 /f”
cmd_admin_Regedit
“REG ADD HKLM\SYSTEM\CurrentControlSet\Services\WcesComm /v SvcHostSplitDisable /t REG_DWORD /d 1 /f”

cmd_admin_Regedit2

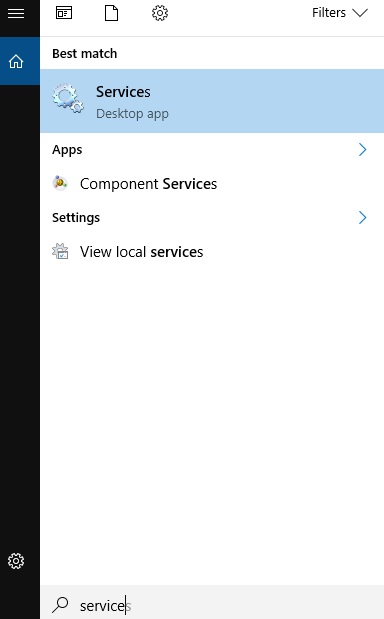
9.   Open services.msc

services

10. Scroll down to Windows Mobile-2003 based device connectivity

services3

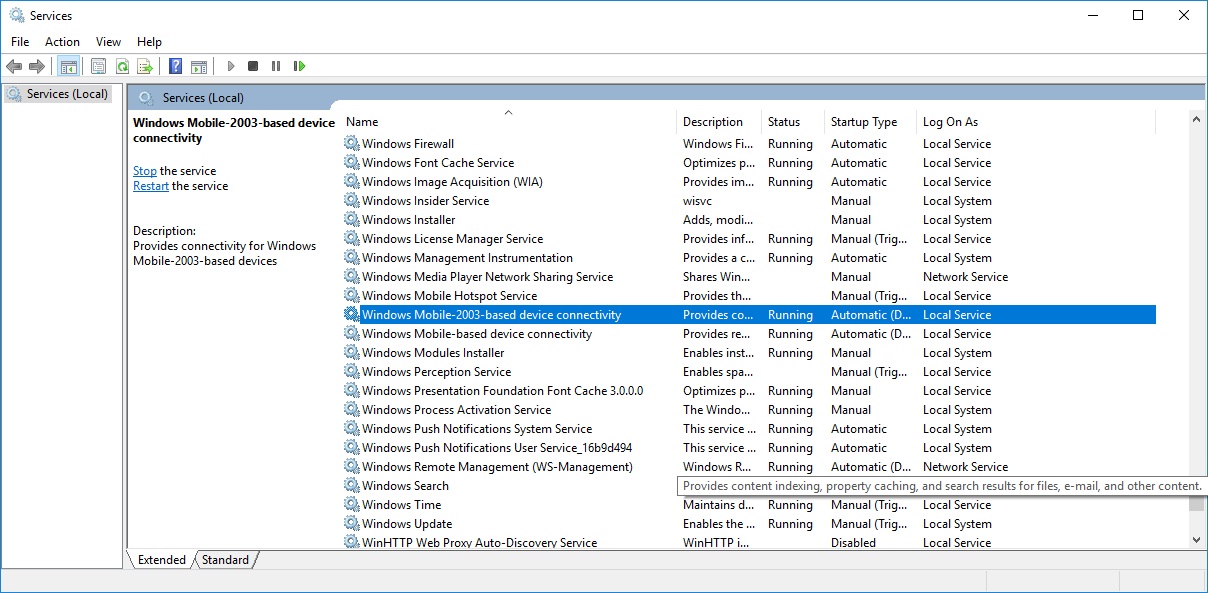
Right click and stop the service if it’s started, if not right click and choose properties

windowsmobile2003

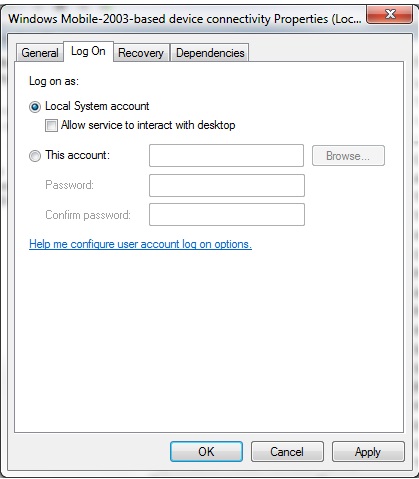
Go to the Log On tab and select the check box for Local System account.

Apply then OK

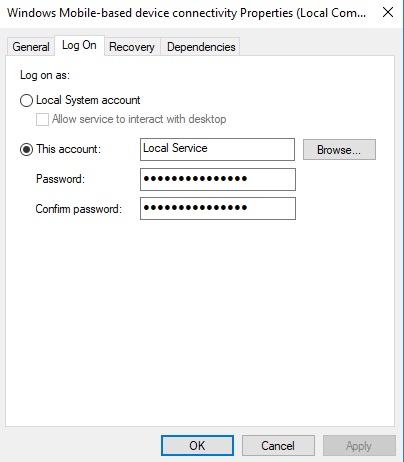
11. Right click on Windows Mobile-based device connectivity and stop the service is started otherwise choose properties
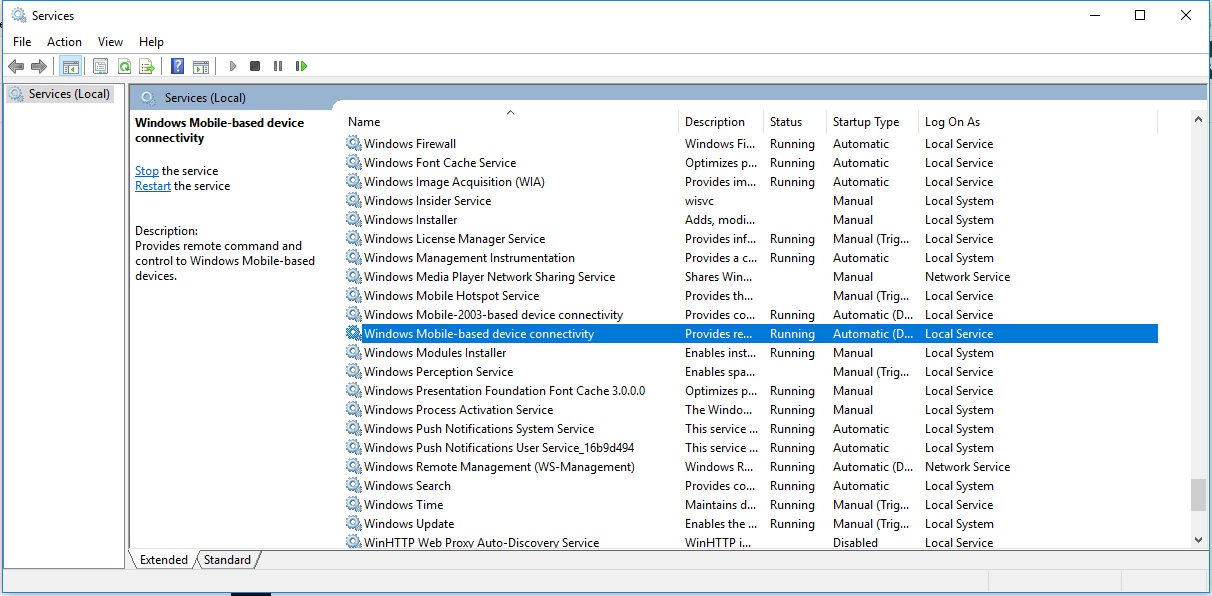
services2

Properties

windowsmobile

12. Download WMDC-Helper.exe

After it has downloaded, move to the desktop and right click and Run as Administrator.

  1. Reboot the PC
  2.  While the PC is rebooting, if there is nothing on the device that needs to be kept, clean/cold boot the device, if there are, warm boot the device.
  3.  After the PC has been rebooted and before opening Windows Mobile Device Center, open Control Panel > Programs and Features > Turn Windows features on or off. Expand .NET Framework 3.5 and check both boxes. Allow Windows to update the feature. or download .NET Framework
  1.  Follow the steps in the Knowledge Base article below:


https://support.waspbarcode.com/kb/articles/windows-mobile-ce-devices-thorough-driver-removal-from-device-manager


Besides the items to look for open USB Serial Bus Controllers.  Look for any USB device that has (Device Descriptor Failed), if there are, remove them

  1.  Open Windows Mobile Device Center, then plug in the mobile device.It should install the drivers and within a few minutes should start showing connecting then connected.


If the mobile device does not connect, in Device Manager, look for any unknown devices that appeared, attempt to update the driver by pointing to C:\Windows\Windows Mobile it should then start installing the driver and connect to Windows Mobile Device Center.

References :

https://support.waspbarcode.com/kb/articles/windows-mobile-device-center-troubleshooting-on-windows-10
https://support.microsoft.com/en-us/help/931937/description-of-windows-mobile-device-center
https://www.microsoft.com/en-us/download/details.aspx?id=55170


The linux admins one useful command called Screen in Linux

Screen command offers the ability to detach a long running process (or program, or shell-script) from a session and then attach it back at a later time.

When the session is detached, the process that was originally started from the screen is still running and managed by the screen. You can then re-attach the session at a later time, and your terminals are still there, the way you left them.

In this article, let us review the how to manage the virtual terminal sessions using screen command with examples.

Screen Command Example 1: Execute a command (or shell-script), and detach the screen

Typically you’ll execute a command or shell-script as shown below from the command.

$ unix-command-to-be-executed

$ ./unix-shell-script-to-be-executed

Instead, use the screen command as shown below.

$ screen unix-command-to-be-executed

$ screen ./unix-shell-script-to-be-executed

Once you’ve used the screen command, you can detach it from the terminal using any one of the following method.

Screen Detach Method 1: Detach the screen using CTRL+A d

When the command is executing, press CTRL+A followed by d to detach the screen.

Screen Detach Method 2: Detach the screen using -d option

When the command is running in another terminal, type the command as following.

$ screen -d SCREENID

Screen Command Example 2: List all the running screen processes

You can list all the running screen processes using screen -ls command.

For example:

On terminal 1 you did the following:

$ screen ./myscript.sh

From terminal 2 you can view the list of all screen processes. You can also detach it from terminal 2 as shown below.

$ screen -ls
There is a screen on:
	4491.pts-2.FC547	(Attached)
1 Socket in /var/run/screen/S-sathiya.

$ screen -d 4491.pts-2.FC547
[4491.pts-2.FC547 detached.]

Screen Command Example 3: Attach the Screen when required

You can attach the screen at anytime by specifying the screen id as shown below. You can get the screen id from the “screen -ls” command output.

$ screen -r 4491.pts-2.FC547

Screen Command Usage Scenario 1

When you have access to only one terminal, you can use screen command to multiplex the single terminal into multiple, and execute several commands. You might also find it very useful to combine the usage of screen command along with the usage of SSH ControlMaster.

Screen Command Usage Scenario 2

When you are working in a team environment, you might walk over to your colleagues desk and get few things clarified. At that time, if needed, you can even start some process from their machine using screen command and detach it when you are done. Later when you get back to your desk, you can login and attach the screen back to your terminal.

 source/reference

Invoking bash

How to Invoke Script made using Bash

So you made your script. Now you need to test it by running it. You can invoke it by sh <scriptname>, or alternatively bash <scriptname>.(Not recommended is using sh <scriptname>, since this effectively disables reading from stdin within the script.) Much more convenient is to make the script itself directly executable with a chmod.
Either:

chmod 555 scriptname

(gives everyone read/execute permission)

or

chmod +rx scriptname

(gives everyone read/execute permission)

 or

chmod u+rx scriptname

(gives only the script owner read/execute permission)


Having made the script executable, you may now test it by ./scriptname.  If it begins with a “sha−bang” line, invoking the script calls the correct command interpreter to run it.

As a final step, after testing and debugging, you would likely want to move it to /usr/local/bin (as root,of course), to make the script available to yourself and all other users as a system−wide executable. The script could then be invoked by simply typing scriptname[ENTER] from the command line.

Samsung Galaxy S4

How to connect Samsung Galaxy S4 to windows phone

I am not new using Android phones, in fact Samsung Galaxy S4 is the 3rd Android phone I have. I had Galaxy Note 1 and 2 before and backing up the photos and videos is just a piece of cake(Just plug the thing on your pc and then it will automatically detect it and connect as a normal USB device) . Now I’ve got my S4 and run out of memory I needed to backup my photos and videos before freeing up space, I was surprised. When I plugged it on my pc, it was not even get detected, I tried using 5 different USB’s and none of them connected my S4 to the PC. I searched the net and found one that helped me connect android phone to pc and this is how.

The Samsung Galaxy S4 is a monster smartphone. I will quickly walk you through how to connect your Samsung Galaxy S4 to a PC and transfer data between both devices.Once connectivity is achieved, you can transfer files using the interface of your operating system. In Windows, you can find the device listed as removable disk under Computer, while Mac users can find the device listed on the Finder.
 

KIES FOR ANDROID PHONES

KIES FOR ANDROID PHONES

Kies:
This is a graphical user interface that allows for transfer of music, photos, and videos between your Samsung Galaxy S4 and your PC. To download this App, for Windows or Mac, visit the Samsung website.

File Format Supported By Samsung Galaxy S4: The Galaxy S4 supports audio files in WAV, MP3, AAC, AAC+, eAAC+, AMR-NB, AMR-WB, MIDI, XMF, EVRC, QCELP, WMA, FLAC, OGG formats and video files in Divx, H.263, H.264, MPEG4, VP8, VC–1 (Format: 3gp, 3g2, mp4, wmv.

3 Easy Steps To Connect Samsung Galaxy S4 To PC


kies

1. If you are a Windows user, simply download and install the USB drivers for the Galaxy S4. Mac users do not need to install any software.

2. Connect the device to an available USB port using any generic USB cable.

Drag
3. A prompt will appear on the screen of the phone. Drag the notification area down, and make a selection of your choice. That’s it. Have a happy time backing up your phone.

ASCII – Special Characters – Alt Keyboard Shortcuts

ASCII

To type a special character, using an Alt keyboard sequence

1. Make sure that the Num Lock key has been pressed, to activate the numeric key section of the keyboard.

2. Press and hold down the Alt key.                        3. While the Alt key is pressed, type the sequence of numbers (on the numeric keypad) from the Alt code in the above table.

4. Release the Alt key, and the character will appear.

Some sequence from the above table skipped since no symbol representation or duplicate symbol.

How to Install memcached in Centos 6

I was building a website of my own and was onmy testing phase when I noticed its a little bit slow. It might be because i have too many graphics loading and heavy database when doing some searching. I searched Google ways to speed up websites and i found out about memcached and found some article on how to install the said application. I tried it and I noticed a big difference on my website’s performance.

MEMCACHED DEFINITION

Memcached is a distributed, high-performance, in-memory caching system that is primarily used to speed up sites that make heavy use of databases. It can however be used to store objects of any kind. Nearly every popular CMS has a plugin or module to take advantage of memcached, and many programming languages have a memcached library, including PHP, Perl, Ruby, and Python. Memcached runs in-memory and is thus quite speedy, since it does not need

to write to disk.

Here’s how to install it on CentOS 6:

Memcached does have some dependencies that need to be in place. Install libevent using yum:

yum install libevent libevent-devel

The memcached install itself starts with

To start installing memcached, change your working directory to /usr/local/src and download the latest memcached source:

cd /usr/local/src 
wget http://memcached.googlecode.com/files/memcached-1.4.15.tar.gz

Uncompress the tarball you downloaded and change into the directory that is created:

tar xvzf memcached-1.4.15.tar.gz
cd memcached-1.4.15

Note:

Check memcached.org for a newer version before proceeding with the installation. Their might be newer version existing after the publication of this post. Please note the tarball version we are using is 1.4.15.

Next, configure your Makefile. The simplest way is to run:

./configure

Additional configure flags are available and can improve performance if your server is capable. For 64-bit OSes, you can enable memcached to utilize a larger memory allocation than is possible with 32-bit OSes:

./configure --enable-64bit

If your server has multiple CPUs or uses multi-core CPUs, enable threading:

./configure --enable-threads

If your server supports it, you can use both flags:

./configure --enable-threads --enable-64bit

n.b.: if the configure script does not run, you may have to install compiling tools on your server. That is as simple as

yum install gcc
yum install make

Once the configure script completes, build and install memcached:

make && make install

Last but not least, start a memcached server:

memcached -d -u nobody -m 512 -p 11211 127.0.0.1

Put another way, the previous command can be laid out like this:

memcached -d -u [user] -m [memory size] -p [port] [listening IP]

Let’s go over what each switch does in the above command:

-d
Tell memcached to start up as a backgrounded daemon process
-u
Specify the user that you want to run memcached
-m
Set the memory that you want to be allocated my memcached
-p
The port on which memcached will listen.

Now your site is ready for a fast run literally.

Resources:

http://memcached.org/

http://www.liquidweb.com/kb/how-to-install-memcached-on-centos-6/

sluggish windows

How to flush memory in windows without rebooting!

When your computer is being sluggish,  you need to free up ram by flushing it. The usual way is to reboot, but try this first before rebooting.

In Windows:
Click on the “Start” button.
Select “Run”
Type the following and press “OK”

 %windir%\system32\rundll32.exe advapi32.dll,ProcessIdleTasks

This should clear your ram without rebooting.

The golden Gate Bridge

San Francisco California, a place of thousand faces.

Summer of 2013, we went on vacation, and the destination is San Francisco California, There are so many reasons why this place is one of the best tourist destination in USA.

  1. The weather is cold (Perfect place to chill out from the summer heat)
  2. It can be reach by any kind of transportation – plane, car, truck, bus
  3. A lot to see in one place. – stores, restaurants, gift shops, tourist spots
  4. Array of tourist spots. – Golden Gate bridge, Piers, Museum of fine arts, Japanese tea garden, Chinatown, Japantown, Fort point, Colt Tower,  Lombard Street, Steep streets of SF, Alcatraz island, Haight Asburry St.
  5. Line of shopping places.  – Westfield, Union Square, Chestnut Street shopping, Embarcadero Center, Haight street shopping, North Beach etc.
  6. Around the world Gastronomic destinations in one place. – San Tung Chinese Restaurant, Farina Foccacia Italian Restaurant,  Ozuma Japanese Restaurant, Nopa American Restaurant, etc.
  7. Ride a cable car.

I love San Francisco except the traffic and parking spaces. So far, the least friendly place for drivers and big cars as per my experience. Take note, we are tourist and it took us one hour finding a parking spot, and its in a garage. We paid $35 after we checked out. I can’t imagine how it feels when you live there and you own a car. Because the roads are narrow, it is usual that you see cars parked on the side of the road with broken side mirrors, dented doors, loosed bumpers or even totally wrecked. As per my count, I saw four cars with situation mentioned above.

We will be back next time since we never got a chance to visit Alcatraz which is our main goal in San Francisco. We didn’t expect that we can’t do a walk-in tour. The  tour to the island is fully booked until 3 weeks from our visit. For those who are planning to visit San Francisco and your main destination is Alcatraz, check online the available tour dates of Alcatraz before booking your trip to San Francisco.  Here’s my list of tourist places to visit in San Francisco.

1. Japanese Tea Garden 

The Japanese Tea Garden in San Francisco, California, is a popular feature of Golden Gate Park, originally built as part of a sprawling World’s Fair, the California Midwinter International Exposition of 1894. For more than 20 years San Francisco Parks Trusts’ Park Guides have given free tours to San Francisco Parks trust members,[1] providing context and history for this historic Japanese-style garden.

The oldest public Japanese garden in the United States, this complex of many paths, ponds and a teahouse features native Japanese and Chinese plants. The gardens 5 acres (2.0 ha) contain many sculptures and bridges.

Japanese Garden, SF

Japanese Garden, SF

Japanese Garden, SF

Japanese Garden, SF

Japanese Tea Garden, SF

Japanese Tea Garden, SF

Japanese Tea Garden, SF

Japanese Tea Garden, SF

Japanese Tea Garden, SF

Japanese Tea Garden, SF

Japanese Tea Garden, SF

Japanese Tea Garden, SF

Japanese Tea Garden, SF

Japanese Tea Garden, SF

Japanese Garden, SF

Japanese Garden, SF

Japanese Tea Garden, SF

Japanese Tea Garden, SF

Japanese Tea Garden, SF

Japanese Tea Garden, SF

Japanese Tea Garden, SF

Japanese Tea Garden, SF

Japanese Tea Garden

Japanese Tea Garden

Japanese Tea Garden

Japanese Tea Garden

buddha

Budha

2. Golden Gate Bridge –

The Golden Gate Bridge is a suspension bridge spanning the Golden Gate, the opening of the San Francisco Bay into the Pacific Ocean. The structure links the U.S. city of San Francisco, on the northern tip of the San Francisco Peninsula, to Marin County. It is one of the most internationally recognized symbols of San Francisco, California, and the United States. It has been declared one of the Wonders of the Modern World by the American Society of Civil Engineers.[7] The Frommers travel guide considers the Golden Gate Bridge “possibly the most beautiful, certainly the most photographed, bridge in the world”.[8]

The golden Gate Bridge

The golden Gate Bridge

The Golden Gate Bridge, SF

The Golden Gate Bridge, SF

golden Gate bridge, SF

golden Gate bridge, SF

3. Palace of Fine Arts –

The Palace of Fine Arts in the Marina District of San Francisco, California, is a monumental structure originally constructed for the 1915 Panama-Pacific Exposition in order to exhibit works of art presented there. One of only a few surviving structures from the Exposition, it is the only one still situated on its original site. It was rebuilt in 1965, and renovation of the lagoon, walkways, and a seismic retrofit were completed in early 2009.

In addition to hosting art exhibitions, it remains a popular attraction for tourists and locals, and is a favorite location for weddings and wedding party photographs for couples throughout the San Francisco Bay Area, and such an icon that a miniature replica of it was built in Disney’s California Adventure in Anaheim.[3]

Palace of fine Arts, SF

Palace of fine Arts, SF

Palace of FIne Arts

Palace of FIne Arts

Palace of fine arts, SF

Palace of fine arts, SF

4. Lombard street

Lombard Street is an east–west street in San Francisco, California. It is famous for having a steep, one-block section that consists of eight tight hairpin turns. The street was named after Lombard Street in Philadelphia by San Francisco surveyor Jasper O’Farrell.[1]

Lombard Street, SF

Lombard Street, SF

Lombard Street, SF

Lombard Street, SF

Lombard Street, SF

Lombard Street, SF

5. Downtown San Francisco (including Japantown, Chinatown, Cable car tour, Haight Ashbury, Pier 39, Fisherman’s wharf)

Downtown San Francisco

Downtown San Francisco

Haight Asbury

Haight Asbury

Haight Ashbury, SF

Haight Ashbury, SF

Haight Ashbury, SF

Haight Ashbury, SF

Downtown San Francisco

Downtown San Francisco

Downtown San Francisco

Downtown San Francisco

Steep Road along Downtown SF

Steep Road along Downtown SF, overlooking Alcatraz Island

Ghirardelli Chocolate Factory

Ghirardelli Chocolate Factory

Riding a cable Car

Riding a cable Car

Riding a cable Car

Riding a cable Car

Riding a cable Car

Riding a cable Car

Ferry Building, SF

Ferry Building, SF

Riding a cable car

Riding a cable car

Downtown San Fancisco

Downtown San Fancisco

Downtown San Fancisco

Downtown San Fancisco

Downtown San Fancisco from the top of Golden Gate Bridge

Downtown San Fancisco from the top of Golden Gate Bridge

Alcatraz Island

Alcatraz Island

coit tower, SF

Coit tower, SF

Alcatraz Island

Alcatraz Island

chinatown, SF

chinatown, SF

japantown, SF

japantown, SF

chinatown, SF

chinatown, SF

chinatown, SF

chinatown, SF

chinatown, SF

chinatown, SF

fisherman's wharf

fisherman’s wharf

6. Fort Point –

Fort Point is a masonry seacoast fortification located at the southern side of the Golden Gate at the entrance to San Francisco Bay. This fort was completed just before the American Civil War by the United States Army, to defend San Francisco Bay against hostile warships. The fort is now protected as Fort Point National Historic Site, a United States National Historic Site administered by the National Park Service as a unit of the Golden Gate National Recreation Area.

Fort Point, SF

Fort Point, SF

Fort Point, SF

Fort Point, SF

Fort Point, SF

Fort Point, SF

Fort Point, SF

Fort Point, SF

That concludes my trip to San Francisco, Hope this blog post can help you decide which place to visit on your next trip. As for the food, I will be posting food in San Francisco in a different blog post. Thank you for reading and have a fun time Traveling.

References:

Lombard Street

Palace of Fine Arts

Golden Gate Bridge

Japanese Tea Garden

Some troubleshooting guide on fixing computer that won’t turn on!

pcwontboot Starting the day with a computer that won’t turn on is very frustrating. There are many reasons why a computer won’t turn on and often very few clues about what might be the problem. The only symptom is usually the simple fact that “nothing works” which isn’t much to go on.Add to this the fact that whatever is wrong could be an expensive part of your PC to replace – like the motherboard or CPU. Do not fear because all may not be lost! Here’s what you need to do:Read #1 below (it’ll make you feel better). Pick the best troubleshooting guide (#2 – #9) based on how your computer is acting or #10 if your PC stops at any point because of an error message.Note: All of these “computer won’t start” troubleshooting guides apply no matter what Windows operating system you have installed on your hard drive, including Windows 8, Windows 7, Windows Vista, and Windows XP. Steps 1 through 5 even apply to other PC operating systems like Linux.

Do not fear because all may not be lost! Here’s what you need to do:

  1. Read #1 below (it’ll make you feel better).
  2. Pick the best troubleshooting guide (#2 – #9) based on how your computer is acting or #10 if your PC stops at any point because of an error message.

Note: All of these “computer won’t start” troubleshooting guides apply no matter what Windows operating system you have installed on your hard drive, including Windows 8, Windows 7, Windows Vista, and Windows XP. Steps 1 through 5 even apply to other PC operating systems like Linux.

1. Don’t Panic! Your Files are Probably OK

Files and Folders - Your Files are Probably OK

When faced with a computer that won’t start most people tend to panic, worried that all the data on their PC is gone forever.

It’s true that the most common reason a computer won’t start is because a piece of hardware has failed or is causing a problem but that hardware isn’t usually a hard drive, the part of your computer that stores all of your files.

In other words, your music, documents, emails, and videos are probably safe – just not accessible at the moment.

So take a deep breath and try to relax. There’s a good chance you can figure out exactly why your computer won’t start and then get it back up and running.

2. Computer Shows No Sign of Power

Computer Shows No Sign of Power

Try these steps if your computer will not turn on and is showing no sign at all of receiving power – no fans running and no lights on the computer case.

Important: You may or may not see a light on the back of your PC depending on the kind of power supply you have and the exact cause of the problem.

Note: Don’t worry about the monitor yet. If the computer is not turning on because of a power issue then the monitor certainly can’t display anything from the computer. Your monitor light will likely be amber/yellow if your computer has stopped sending information to it.

3. Computer Powers On… and Then Off

Computer Powers On and Then Off

Follow these steps if, when you turn your computer on, it promptly powers back off.

You’ll probably hear the fans inside your computer turn on, see the lights on the front of your computer turn on or flash, and then it will all stop. You won’t see anything on the monitor and you may or may not hear beeps coming from the computer before it shuts off by itself.

Note: As in the previous scenario, don’t worry about the state your monitor is in. You may have a monitor issue as well but it’s not possible to troubleshoot it quite yet.

4. Computer Powers On But Nothing Happens

Computer Powers On But Nothing Happens

If your computer seems to be receiving power after turning it on but you don’t see anything on your monitor, try these troubleshooting steps.

In these situations, the power lights will stay on, you’ll likely hear the fans inside your PC running, and you may or may not hear one or more beeps coming from the computer.

This situation is probably the most common in my experience working with computers that won’t start. Unfortunately it’s also one of the most difficult to troubleshoot.

5. Computer Stops or Continuously Reboots During the POST

Computer Stops or Continuously Reboots During the POST

Use this guide when your computer powers on, shows at least something on the monitor, but then stops, freezes, or reboots over and over again during the Power On Self Test (POST).

The POST on your computer may look like the screenshot to your left or may instead simply show your computer maker’s logo.

Important: Don’t use this troubleshooting guide if you encounter an issue during the loading of the operating system, which occurs after the Power On Self Test is complete. Troubleshooting Windows related reasons why your computer won’t turn on begin with #6 below.

6. Windows Begins to Load But Stops or Reboots on a BSOD

BSOD - Computer Turns On But an Error Prevents Windows From Loading

If your computer begins to load Windows but then stops and displays a blue screen with information on it then try these steps. You may or may not see the Windows splash screen before the blue screen appears.

This kind of error is called a STOP error but is more commonly referred to as a Blue Screen of Death or a BSOD. Receiving a BSOD error is a common reason why a computer won’t turn on.

Important: Choose this troubleshooting guide even if the BSOD flashes on screen and your PC restarts automatically without giving you time to read what it says.

7. Windows Begins to Load But Stops or Reboots Without an Error

Windows Begins to Load But Stops or Reboots Without an Error

Try these steps when your computer powers on, starts to load Windows, but then freezes, stops, or reboots over and over again without generating any kind of error message.

The stopping, freezing, or reboot loop may happen on the Windows splash screen as shown to the left or even on a black screen, with or without a flashing cursor.

Note: If your computer won’t start and you see a blue screen flash or remain on the screen, you’re experiencing a Blue Screen of Death and should use troubleshooting guide #6 above.

Important: If you suspect that the Power On Self Test is still going on and that Windows has not yet started to boot, a better troubleshooting guide for why your computer won’t turn on might be #5 above. It’s a fine line and sometimes hard to tell.

8. Windows Repeatedly Returns to the Advanced Boot Options Screen

Windows Repeatedly Returns to the Advanced Boot Options Screen

Use this guide when nothing but the Advanced Boot Options screen appears every time your restart your computer and none of the Windows startup options work.

In this situation, no matter which Safe Mode option you choose, your computer eventually stops, freezes, or restarts on its own, after which you find yourself right back at the Advanced Boot Options menu.

This is a particularly annoying way in which your computer won’t turn on because you’re trying to use Windows’ built-in ways to solve your problem but you’re getting nowhere with them.

9. Windows Stops or Reboots On or After the Login Screen

Windows Stops or Reboots On or After the Login Screen

Try this troubleshooting guide when your computer powers on, Windows shows the login screen, but then freezes, stops, or reboots here or anytime after.

The stopping, freezing, or reboot loop may happen on the Windows login screen, as Windows is logging you in (as shown to the left), or any time up to Windows fully loading.

10. Computer Doesn’t Fully Start Because of an Error Message

NTLDR is Missing

If your computer turns on but then stops or freezes at any point, showing an error message of any kind, then use this troubleshooting guide.

Error messages are possible at any stage during your computer’s boot process, including during the POST, at any time during the loading of Windows, all the way up to the Windows desktop appearing.

Note: The only exception to using this troubleshooting guide for an error message is if the error is a Blue Screen of Death. See #6 above for a better troubleshooting guide for BSOD issues.